Summary
This page describes how to create an NTier Application from the start, step by step.
To create an application from a database schema, see NTier Application Wizard.
Installation
Install NTier by downloading and running the
NTier for Visual Studio installation package.
Creating an new NTier Application project
-
Click File->New->Project.
The 'New Project' dialog will appear:
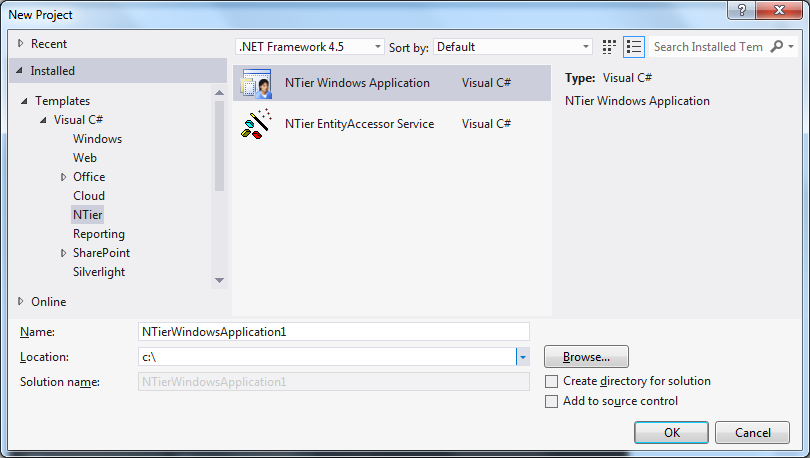
- In the left 'Project types' pane, choose 'NTier'.
- In the right 'Templates' pane, choose 'NTier Windows Application'.
- Choose a name and location and press the OK button.
Opening the NTier tool window
-
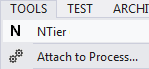
To load the NTier designer, inside of Visual Studio click Tools->NTier:
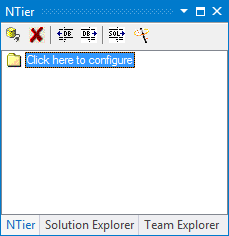
The NTier Designer tool window will appear:
-
Click on the tool window to load the NTier project that comes with the enterprise template:
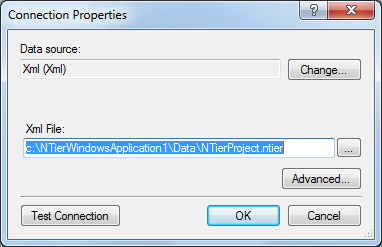
Press OK to accept the project file that was found.
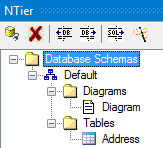
The NTier Designer tool window can be used to add schemas, schema diagrams and tables by right-clicking on a node and selecting 'Add New'.
Creating the relational data model
-
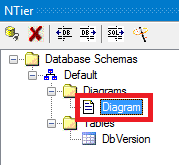
Open the Schema Diagram to start designing the relational model:
Note that the Columns tool window will also appear. Dock it to the bottom of the screen.
-
Click the 'New Table' icon to add a table to the schema and diagram:

-
Drag the table title to move it around, and click the title once to edit the table name:
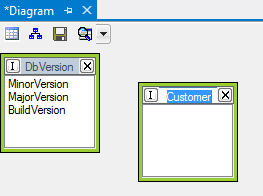
This table has been named 'Customer' for this example.
-
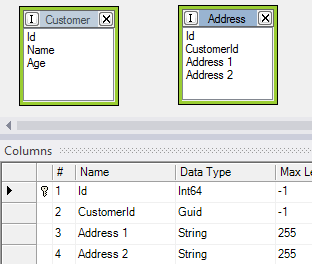
Enter columns for the table, and set the Primary Key:
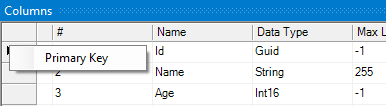
Id, Name and Role have been entered as columns for this example.
The 'Id' colum has been nominated as the primary key.
-
Create a new table named 'Address':
-
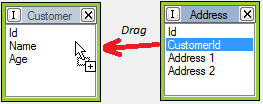
Add a foreign key relationship between the two tables by dragging CustomerId to Id:
-
Press enter or OK on the 'Edit Relationship' form that appears to save the relationship.
The new relationship will be shown on the schema diagram:
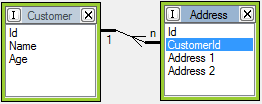
The relationship may be subsequently edited from the table edit form, or by double-clicking on
the relationship from the schema diagram.
Table editor
-
The NTier Designer tool window can be used to add schemas, schema diagrams and tables by
right-clicking on a node and selecting 'Add New'.
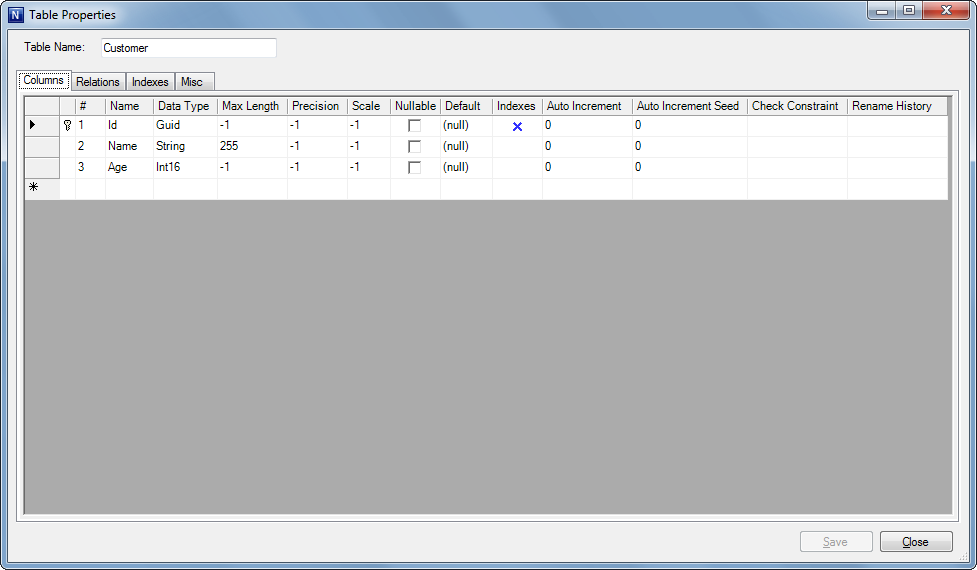
It can also be used to edit tables outside of the schema diagram designer:

Table columns tab:
| Field |
Description |
| # |
The ordinal of the column. This value may be modified to re-arrange the order of columns. |
| Name |
The name of the column. |
| Data Type |
The data type of the column, expressed using type codes that are not specified any provider. |
| Max Length |
For string or binary column types, the maximum length of the field or -1 for the maximum allowed length. |
| Precision |
For floating point column types, the precision of the column, otherwise -1. |
| Scale |
For floating point column types, the scale of the column, otherwise -1. |
| Nullable |
Specifies whether the column value can be set to a null value. |
| Default |
The default value of the column. A literal value is expressed in quotes ('literal'), and an expression is expressed
in a format recognised by the underlying database venor.
|
| Indexes |
Visually displays column indexes. Indexes are coloured Blue for Primary Key, Red for Unique and Black for Non-Unique indexes. |
| Auto Increment |
Set to a non-zero value to set to an identity column whose value is automatically incremented by the database for each new record |
| Auto Increment Seed |
Set to a non-zero value to set the auto-increment seed. |
| Check Constraint |
An expression that's used to validate the column value in the database. |
| Rename History |
Provides a list of prior names that were assigned to the column, so that a column rename can be applied when the database schema is upgraded. |
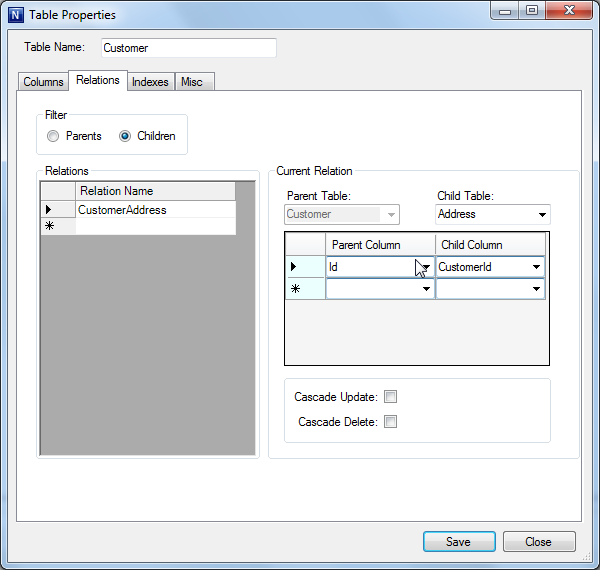
Table relationships tab:
| Field |
Description |
| Filter |
Select 'Parents' or 'Children' to display relationships related to the table. |
| Relations |
The list of relationships related to the table. Note that Parent and Child relationships are not shown at the same time,
but depend on the setting in the Filter field.
|
| Parent Table |
The parent table of the currently selected relationship. |
| Child table |
The child table of the currently selected relationship. |
| Columns Grid |
This grid shows the Parent and Child column pairs for the relationship. |
| Cascade Update |
Specifies whether the database should automatically update primary key values when a foreign key value is updated to maintain referential integrity. |
| Cascade Delete |
Specifies whether the database should automatically delete records in the child table when a record in the parent table is deleted. |
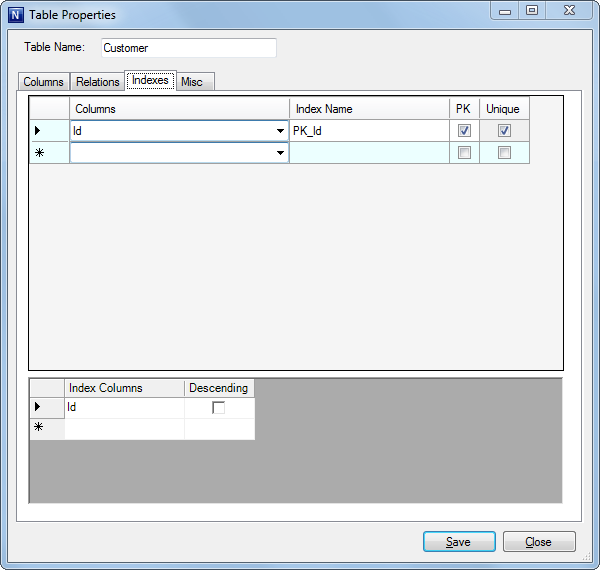
Table indexes tab:
| Field |
Description |
| Columns |
A comma-separated list of the index columns (also shown in bottom index columns grid) |
| Index Name |
The name of the index. |
| PK |
When ticked, represents the primary key of the table. |
| Unique |
When ticked, the values that make up the index must be unique. |
| Index Columns |
The columns that participate in the currently selected index in the top grid. |
| Descending |
When ticked, the column is indexed in descending order of value. |
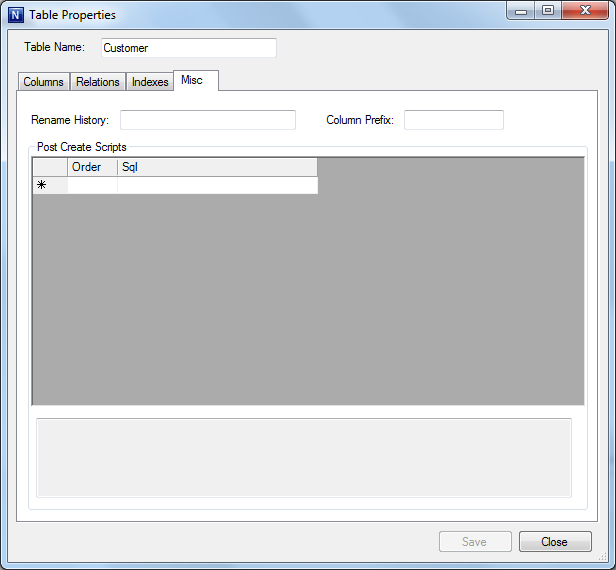
Misc tab:
| Field |
Description |
| Rename History |
Provides a list of prior names that were assigned to the table, so that a table rename can be applied when the database schema is upgraded. |
| Column Prefix |
A prefix string that by convention is prefixed to each column in the table. The prefix is removed when generating entity property names. |
| Post Create Scripts |
A list of sql scripts that are run when the database schema is created for the first time. |
The database schema will be used as a basis for creating the entity model.
Creating the entity model
-
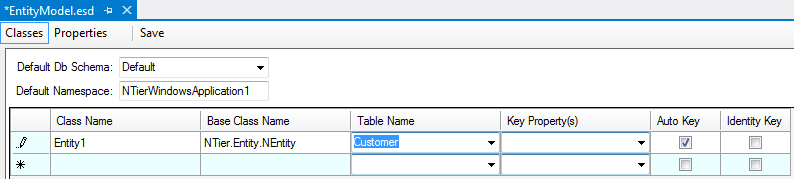
Double-click Entity/EntityModel.esd to open the NTier Entity Model Editor:
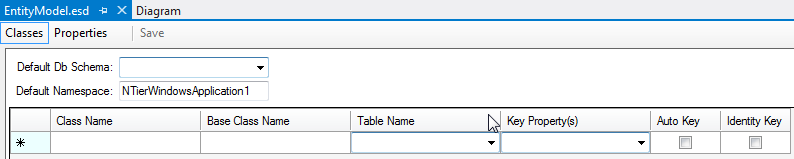
- Set 'Default Db Schema' to 'Default'.
-
Click into the grid to create a new entity, and set the Table Name to 'Customer' (don't set any other fields just yet).
-
After entering the table name and tabbing off, the 'Database Synchronization Tasks' dialog will appear:
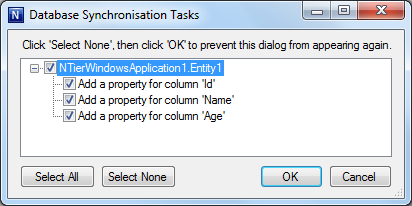
Press OK to perform the actions listed. In this case, 3 properties will be created for the 3 columns.
-
Create a 2nd entity with table 'Address' in the same way.
Examine the entity properties by navigating to the Properties tab:


You'll notice that adding the Address entity has created an Addresses collection property on the
Customer entity which represents the child relationship between Customer and Address.
-
Save the entities by clicking the Save button at the top of the editor.
Saving the entity model triggers the following actions:
- Changes to the .esd file are saved.
-
The .cs file is re-generated from the .esd file. The .cs file contains an abstract base class for each entity.
The class names are prefixed with 'Auto' to distinguish them from their entity subclasses.
- The user is prompted to generate entity subclasses (for those that don't exist):
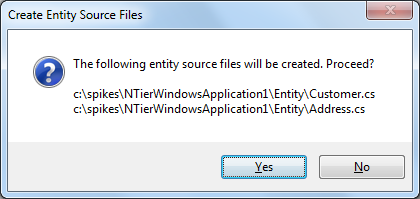
Calculated properties and validation are usually added to the derived entity class.
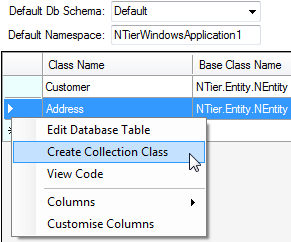
-
Create the AddressCollection class.
Right click the Address entity class and choose 'Create Collection Class':
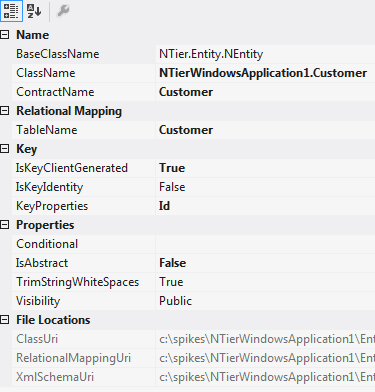
Entity Model Properties
In the entity model designer, properties are editable at the class or property level as grid columns,
or fields in the Visual Studio Property Window.
The following Entity Class properties are available:
| Field |
Description |
| BaseClassName |
The name of the base class. Note that it's recommended (although not strictly required) that entities ultimately inherit from NTier.Entity.NEntity. |
| ClassName |
The fully qualified class name. |
| TableName |
If the entity is stored in a database, this property contains the name of the database table the entity is mapped to. |
| ContractName |
The name of the DataTable that the entity's property values are stored in.
Note that the DataTable name is different to the database table name.
|
| KeyProperties |
A comma-separated list of the key property names that uniquely identify the entity. |
| IsKeyClientGenerated |
True to automatically generate the entity's guid, decimal or int64 primary key column as the entity is created.
Decimal or int64 key values are generated from the database session id to ensure they are globally unique.
|
| IsKeyIdentity |
True to map the property to an identity primary key column that's auto-incremented on the database server.
The underlying database column must have it's auto-increment setting turned on. The primary key value is
auto-incremented as entities are created in memory, and then adjusted to the values assigned on the database
as the entities are saved.
|
| Visibility |
The visibility of the class. |
| IsAbstract |
True if the class is intended to be subclassed. |
| TrimStringWhiteSpaces |
True to automatically trim whitespaces from the beginning and end of each property value when set. |
| Conditional |
The c# generated property code is surrounded in an #if [conditionalvalue] if assigned. |
| ClassUri |
The location of the class definitions, usually the .esd file. |
| RelationalMappingUri |
The location of the relational mapping definitions, usually the .esd file. |
| XmlSchemaUri |
The location of the xml schema, usually the .esd file. |
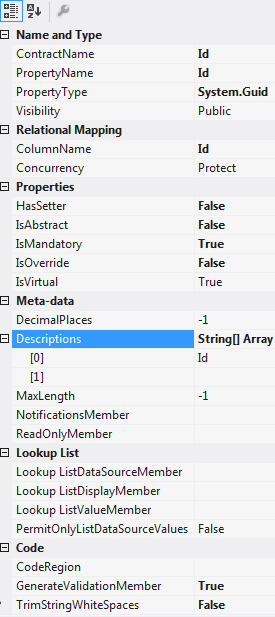
The following Entity Property properties are available:
| Field |
Description |
| PropertyName |
The name of the property. |
| PropertyType |
The c# data type of the property. |
| ColumnName |
If the entity is stored in a database, this property contains the name of the database column the entity is mapped to. |
| ContractName |
The name of the DataColumn that the property value is stored in.
Note that the DataColumn name is different to the database column name.
|
| Visibility |
The visibility of the property inside the class. |
| HasSetter |
True to provide a setter for the property. This can have cascade update ramifications when applied to a primary key property. |
| IsAbstract |
True if the property must be overridden in a subclass. |
| IsVirtual |
True if the property may be overridden in a subclass. |
| IsOverride |
True if the property is to override a property with the same name in the base class. |
| Concurrency |
The concurrency setting of the column. Set to Protect to raise an error if another user has changed the property since the last save. |
| IsMandatory |
True to provide a validation error if a value hasn't been entered for the property. |
| TrimStringWhiteSpaces |
True to automatically trim whitespaces from the beginning and end of the property value when set. |
| DecimalPlaces |
Provides the DecimalPlaces meta-data value as a constant.
The TextBox control uses this value to restrict the number of decimal places that may be entered.
|
| MaxLength |
Provides the MaxLength meta-data value as a constant.
The TextBox, ComboBox and LookupControl controls use this value to restrict the length of text that may be entered.
|
| ReadOnlyMember |
Provides the ReadOnly meta-data value from a calculated property. |
| Descriptions |
See the section below on Providing localizable property captions/descriptions. |
| NotificationsMember |
Provides the Notifications meta-data by specifying a method that's used to provide validation. |
| GenerateValidationMember |
True to generate a virtual validation method for the property that may be readily overridden in the entity subclass. |
| Lookup ListDataSourceMember |
Provides the ListDataSource meta-data value from a calculated property by specifying the name of a property that returns a lookup list.
ComboBox and LookupControl controls uses the list to provide lookup items.
|
| Lookup ListDisplayMember |
Provides the ListDisplayMember meta-data value as a constant value.
The display member specifies a property on a lookup list item that returns the text displayed within ComboBox and LookupControl controls.
|
| Lookup ListValueMember |
Provides the ListValueMember meta-data value as a constant value.
The value member specifies a property on a lookup list item that returns the value that's committed to the entity property
on data binding for ComboBox and LookupControl controls.
|
| PermitOnlyListDataSourceValues |
True to provide a validation error if the property value entered doesn't exist in the list returned from ListDataSourceMember,
for the value returned from ListValueMember for each list item.
|
| CodeRegion |
Specifies the code region to place the property into. |
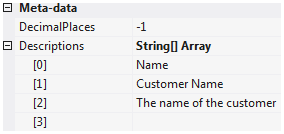
Providing localizable property captions/descriptions
Descriptions assigned to entity class properties may be automatically shown to the left of field controls or
grid column headers. Multiple descriptions of varying lengths may be provided, of which the one
with the width most appropriate to the column width or field location is shown.
Descriptions can be edited in the Property Window for each property:
To localize descriptions, change the Description Language on the Properties tab of the entity model editor:
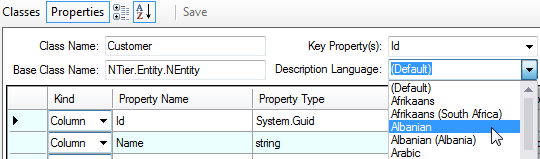
After selecting a new language, enter new captions for each property. The captions entered will appear in the EntityModel.xx.resx file,
where xx is the language code. At runtime, the current culture is used to determine which description strings to use.
- Navigate to the 'Forms' folder in Solution Explorer.
-
Right click the 'Forms' folder and select Add->New Item:
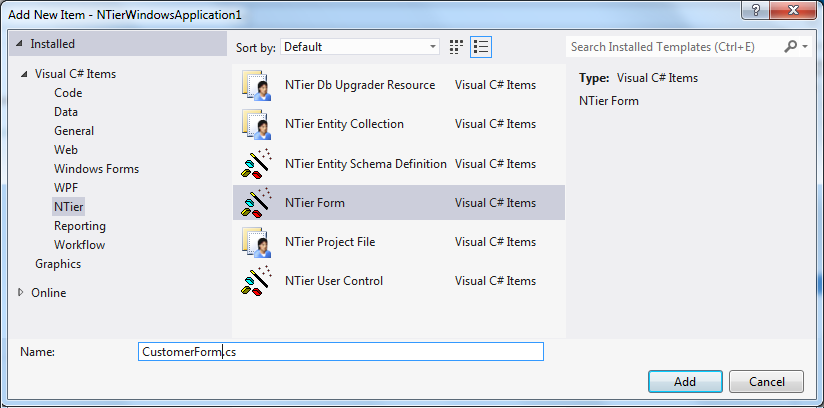
- In the left pane, choose 'NTier'.
- In the right pane, choose 'NTier Form'.
- Name the item 'CustomerForm' and press Add.
Add data binding controls
- Firstly, build the project to ensure the entity classes are accessible from the designer.
-
Set BindingSource.DataSourceType to the top-level entity type that the form will bind to.
This may be a collection type (in the case of binding to a grid) or an entity type.

The DataSourceType provides intellisense to help locate the type name.
-
Add a TextBox control for the customer name. Set the BindingMember to 'Name' using the smart tag:
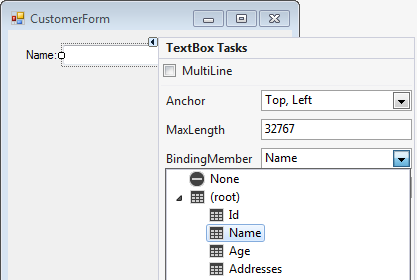
You'll notice that a label caption was automatically added to the left of the control.
This caption is taken from the 'Descriptions' setting on the entity property in the entity model.
The label caption can be hidden by setting LabelCaptionVisible to false on the text box control if desired.
Add another control for the 'Age' property. Add a TextBox and set the BindingMember to 'Age'.
-
Add a DataGridView control for the 'Addresses' property. After adding the control, the a message will appear prompting to change to NDataGridView:
Click OK to change the DataGridView to use NDataGridView.
-
Set the BindingMember of the NDataGridView to 'Addresses':
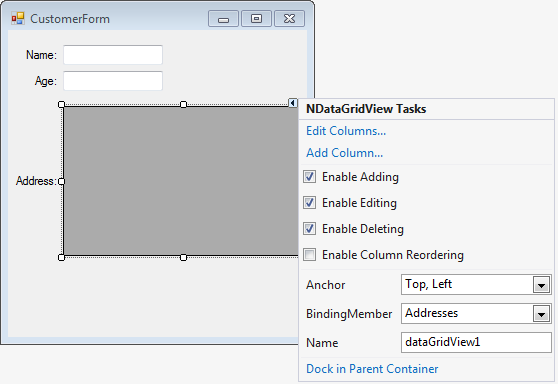
A label caption is placed to the left of the grid. Again, this may be removed by setting LabelCaptionVisible to false on the control.
-
Add columns to the grid. Double click on the grid to show the column editor.
-
Click the 'Add' button to add the Name and Age columns.
The value of the HeaderText column property will be set
automatically from the entity model description. If set manually, the column setting in the UI will
override the description setting on the entity property. The HeaderText property may subsequently be directed
to take the value from the entity model once again by clearing its value.
Add save and close buttons with NTier Actions
-
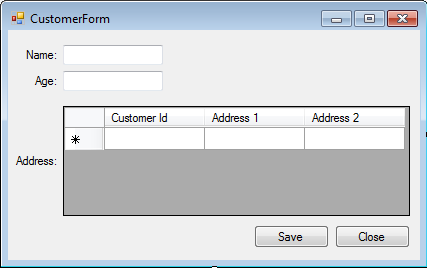
Add two buttons, and label them 'Save' and 'Close':
-
Open the smart tag of the Save button and select the FormSaveAction action:
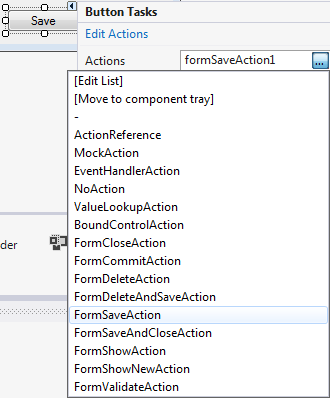
- Open the smart tag of the Close button and select the FormCloseAction action.
Attach data to the form
Configuring the database connection
-
Edit App.config and change [ProviderName] to Microsoft.SqlServer and [ConnectionString] to an appropriate database connection string.
The database will be populated with the database schema when the application is first executed.
For example, the following will open a database file from C:\Sample.mdf using SQL Express.
<add name="database" connectionString="Data Source=.\SQLEXPRESS;AttachDbFilename=C:\Sample.mdf;Integrated Security=True;Connect Timeout=30;User Instance=True" providerName="Microsoft.SqlServer"/>
-
To create an empty sql database file, follow these steps:
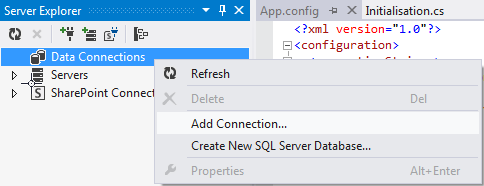
- Open 'Server Explorer' by pressing Control-Alt-S from within Visual Studio.
-
Right-click Data Connections and click 'Add Connection':
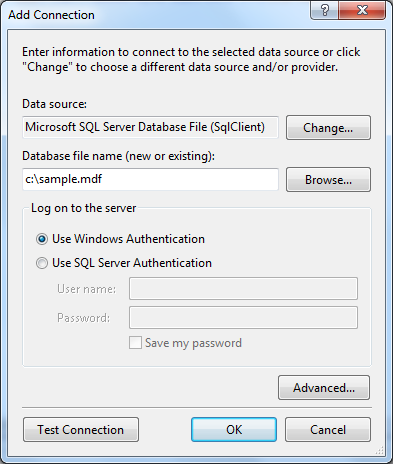
- Change the Data Source to 'Microsoft SQL Server Database File (Sql Client)'
-
Choose the destination file name:
-
Click 'Advanced'.
Change the 'Data Source' to an appropriate database provider (such as .\SQLEXPRESS).
Set 'User Instance' to True.
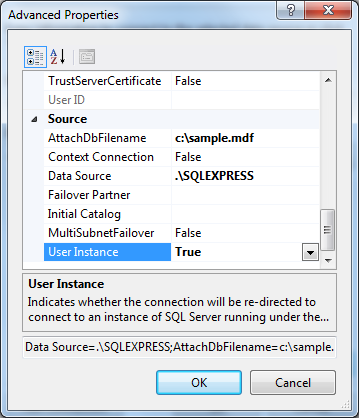
-
Press OK. If the database doesn't already exist, you will be prompted to create one.
-
Press F5 to start the application.
A prompt to upgrade the database will appear:

Click 'Yes' to continue.
-
The database will be upgraded:
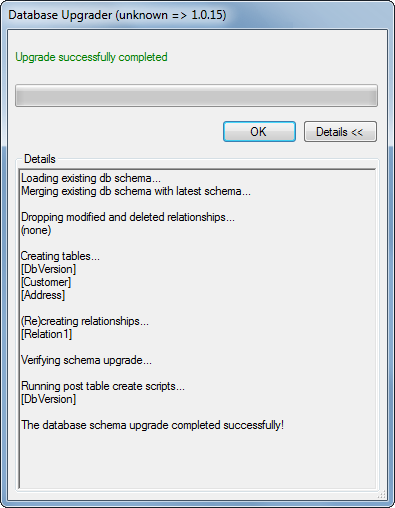
Click 'OK' to continue.
-
The newly created form will appear.
The form may be tested by entering some data and clicking save.
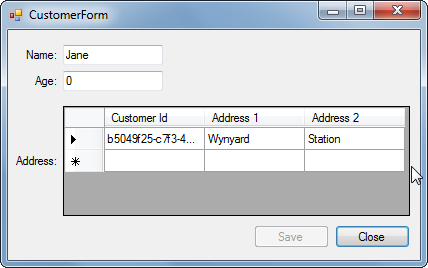
After re-opening the application after the first save, the top 1 Customer record will be loaded.
Back to NTier Documentation